【Python】pubnub を使って bitflyer の Ticker 情報をリアルタイム表示する
おはようございます。
今回は、pubnubというサービスを用いてリアルタイムメッセージング機能というのを試してみたくて色々調べてみました。
(ただ、結果的にあまりうまくできてませんが)
pubnubについて調べていると Bitflyer(仮想通貨取引所)が板等の更新情報を配信しているということなので、それを利用してWEBサービスにリアルタイムでデータを表示してみます。
スポンサーリンク
新規プロジェクトの作成
PyCharmを起動し、新しくプロジェクトを作成します。
今回は「BfTool」としました。
プロジェクトの作成については、大した手順ではないですが次の記事を参考にしてください。
【Python】PyCharmのインストールからHello Worldまで
また、構成は次の通りです。
BfTool
│ Sample.py
├─static
│ ├─css
│ │ style.css
│ └─js
│ script.js
├─templates
│ index.html
└─venv
パッケージ追加
今回は Tornado の他に「pubnub」というパッケージを追加します。
パッケージ追加の方法についても前回の記事を参考にしていただけると幸いです。
【Python】PyCharm でパッケージ追加と別ファイルのクラス読込
画面の作成
index.html
1 2 3 4 5 6 7 8 9 10 11 12 13 14 15 16 17 18 19 20 21 22 23 24 25 26 27 28 29 30 31 | <!DOCTYPE html> <html> <head> <title>{{ title }}</title> <link rel="stylesheet"href="{{ static_url('css/style.css') }}"/> <script type="text/javascript"src="{{ static_url('js/script.js') }}"></script> <script type="text/javascript"src="http://ajax.googleapis.com/ajax/libs/jquery/1.7.2/jquery.min.js"></script> </head> <body onload="initialize();"> <div id="container"> <div style="clear:both; padding-top:10px;"> <table id="dataTable"> <tr id="header"> <th style="width:5%">種別</th> <th style="width:10%">時刻</th> <th style="width:5%">ID</th> <th style="width:5%">売値</th> <th style="width:5%">買値</th> <th style="width:10%">売り数量</th> <th style="width:10%">買い数量</th> <th style="width:10%">売り注文総数</th> <th style="width:10%">買い注文総数</th> <th style="width:10%">最終取引価格</th> <th style="width:10%">出来高</th> <th style="width:10%">価格単位出来高</th> </tr> </table> </div> </div> </body> </html> |
style.css
1 2 3 4 5 6 7 8 9 10 11 12 13 14 15 16 17 18 19 20 21 22 23 24 25 26 27 28 29 30 | body { font-family:"MS Pゴシック","MSPGothic",sans-serif; width:100%; margin:0auto; } div { margin:20px; } div#container{ width:100%; } table { width:95%; border:1pxsolid#ccc; border-collapse:collapse; } th { text-align:center; background-color:#404040; color:#ffffff; width:100px; height:25px; border:1pxsolid#ccc; } td { padding-left:5px; width:200px; height:20px; border:1pxsolid#ccc; } |
プログラムの作成
Sample.py
1 2 3 4 5 6 7 8 9 10 11 12 13 14 15 16 17 18 19 20 21 22 23 24 25 26 27 28 29 30 31 32 33 34 35 36 37 38 39 40 41 42 43 44 45 46 47 48 49 50 51 52 53 54 55 56 57 58 59 60 61 62 63 64 65 66 67 68 69 70 71 72 73 74 75 76 77 78 79 80 81 82 83 84 85 86 87 88 89 90 91 92 93 94 95 96 97 98 99 100 101 102 103 104 105 106 107 | importjson importlogging importos importsignal importtime importtornado.ioloop importtornado.web importtornado.websocket fromtornado.options importoptions frompubnub.pnconfiguration importPNConfiguration frompubnub.pubnub importPubNub,SubscribeListener is_closing=False pb=None my_listener=None defsignal_handler(signum,stack): u""" サーバー停止信号を受信した際にフラグをオンにします.""" globalis_closing logging.info("exiting...") is_closing=True deftry_exit(): u""" サーバー停止フラグがオンの場合にインスタンスを停止します. """ globalis_closing ifis_closing: # clean up here tornado.ioloop.IOLoop.instance().stop() logging.info("exit success") classMainHandler(tornado.web.RequestHandler): u""" メイン処理 """ definitialize(self): logging.info("initialize") defget(self): self.render("index.html",title="Pythonサンプル") classSendWebSocket(tornado.websocket.WebSocketHandler): defopen(self): logging.info('SendWebSocket IP:'+self.request.remote_ip) self.ioloop=tornado.ioloop.IOLoop.instance() self.send_websocket() defon_close(self): print("Session closed") globalpb globalmy_listener pb.unsubscribe().channels(['lightning_ticker_BTC_JPY','lightning_ticker_FX_BTC_JPY']).execute() my_listener.wait_for_disconnect() defcheck_origin(self,origin): returnTrue defsend_websocket(self): self.ioloop.add_timeout(time.time()+1,self.send_websocket) ifself.ws_connection: globalpb globalmy_listener # Bitflyer の キーを設定してインスタンスを生成、 # リスナーを追加 pnc=PNConfiguration() pnc.subscribe_key="sub-c-52a9ab50-291b-11e5-baaa-0619f8945a4f" pnc.ssl=False pb=PubNub(pnc) my_listener=SubscribeListener() pb.add_listener(my_listener) # チャンネルの設定 pb.subscribe().channels(['lightning_ticker_BTC_JPY','lightning_ticker_FX_BTC_JPY']).execute() my_listener.wait_for_connect() # BTC-FX/JPY の結果を取得 fx_result=my_listener.wait_for_message_on('lightning_ticker_FX_BTC_JPY') fx_data=fx_result.message message=json.dumps(fx_data) logging.info(message) self.write_message(message) app=tornado.web.Application([ (r"/",MainHandler), (r"/ticker",SendWebSocket) ], template_path=os.path.join(os.getcwd(),"templates"), static_path=os.path.join(os.getcwd(),"static"), js_path=os.path.join(os.getcwd(),"js"), ) if__name__=="__main__": tornado.options.parse_command_line() signal.signal(signal.SIGINT,signal_handler) app.listen(8888) logging.info("server started") tornado.ioloop.PeriodicCallback(try_exit,100).start() tornado.ioloop.IOLoop.instance().start() |
script.js
1 2 3 4 5 6 7 8 9 10 11 12 13 14 15 16 17 18 19 20 21 22 23 | // スクリプト読み込み時の処理 functioninitialize(){ varconnection=newWebSocket('ws://127.0.0.1:8888/ticker'); connection.onmessage=function(e){ vardata=JSON.parse(e.data.replace(/\\/g,"")); vartable=$("#dataTable"); // 日付け変換 vardate=newDate(data.timestamp); data.timestamp=date.toLocaleString(); // テーブルに追加 vartr=document.createElement("tr"); $.each(data,function(i,cell){ vartd=document.createElement("td"); td.innerHTML=cell; tr.appendChild(td); }); $(tr).insertAfter("#header"); }; } |
起動してみる
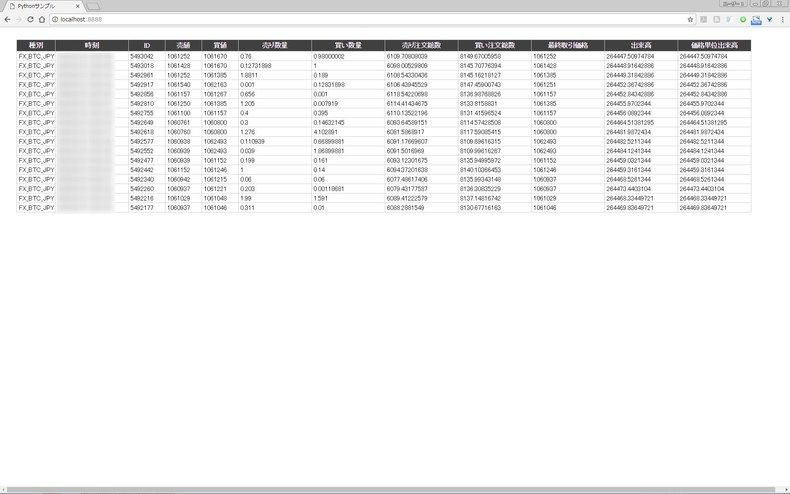
起動後、「http://localhost:8888」にアクセスします。

1秒間隔で情報が更新され、テーブルにデータが追加されていきます。
まとめ
本当は Bitflyer からの更新情報のメッセージを受信(をトリガーに)してデータ表示を更新させるようにしたかったのですが、Tornado の WEBサーバーと同時に起動する方法で嵌ったので仕方なくこういった形になりました。
別スレッドや別プロセスで動かせばいいのかなとか考えたのですが、まあとりあえず表示したかったので。。
次回以降もうちょっと調べてみようと思います。
ではでは。


ディスカッション
コメント一覧
まだ、コメントがありません